Using the Global Filter
Using the Global Filter
#380100
The global view and filter allows you to set and control the scope of systems on which all components of the user interface report upon, i.e. reporting, managing of supply and demand, etc. Once defined, you are able to drill down by clicking hyperlinks in any of the reports and see only the scope of systems as defined by the global filter.
Filtering is done at the cluster level since most reports provide results at his level. Additionally, you can filter based on cluster/infrastructure group capabilities that have been set via the Capability Definitions These settings are all configured for you by Densify. Contact [email protected] for details.
A default view, "Total Estate" is provided so that you can access Densify reports and features immediately without having to create a view or filter. The default view breakdown is by Environment. This view can be copied and modified to create custom views but cannot be deleted.
As you drill down within the reports, you no longer need to change the global filter parameters from within the detailed report. The title for each of these detailed reports dynamically displays the Environment and Cluster names, on which the filter is based. These detailed reports are generated when you click on a link in a tabular report.
- Hosts at Risk Details Report—This drill down report is accessible by clicking on the hyperlink values in the column: "Hosts at Risk" from the report, Clusters with Hosts at Risk.
- Rebalance Recommendations Report—This drill down report is accessible by clicking on the hyperlink values in the column: "Rebalance Recommendations" from the report, Clusters with Hosts at Risk.
- Undersized Guest Details—This drill down report is accessible by clicking on the hyperlink values in the column: "Undersized Guests" from the report, Clusters with Undersized Guests.
- Bump-Up Recommendations Report—This drill down report is accessible by clicking on the hyperlink values in the column: "Bump-Up Recommendations" from the report, Clusters with Undersized Guests.
- Oversized Guest Details Report—This drill down report is accessible by clicking on the hyperlink values in the column: "Oversized Guests" from the report, Clusters with Oversized Guests.
- Bump-Down Recommendations Report—This drill down report is accessible by clicking on the hyperlink values in the column: "Bump-Down Recommendations" from the report, Clusters with Oversized Guests
- Bump-Down Recommendations Report—This drill down report is accessible by clicking on the hyperlink values in the column: "Detailed Policy Settings" from the report, Control Policies > Supply Optimization.
Within each report page you can access the Infrastructure Navigator by clicking Set Filter located at the top of the page. The sections in this drop-down list control the scope of clusters that are displayed across all of the report dashboards and other pages (e.g. Plan and Manage Supply, Forecast, etc.).
- Click Set Filter to access the dropdown menu. This option is located in the page header.
- Review the list and ensure the required environments and clusters, on which you want to report, are selected. Observe the following:
- Selecting an environment, includes all of its contained clusters;
- You can select clusters individually, by expanding the environment, and de-selecting the clusters that you do not want to include;
- You can click Reset, at any time to select all environments and their contained clusters;
- You can drag the lower right corner of the dialog box to resize the Infrastructure Navigator window.
- Click Apply. The displayed reports are updated based on your selections.
Permissions
When multiple users are using the Densify interface and have created different views, the global filter selections are saved and displayed for each user login. However, custom selections that are made in the Infrastructure Navigator within a session are not saved between login sessions. This is due to the fact that the content of the Infrastructure Navigator can change frequently.
Each user can create and edit their own views. Users can modify the options in the Infrastructure Navigator and filter criteria and save your changes. Users can see, apply and copy other user's customized views, but cannot edit or delete them.
All users can see all of the system (default) views), but only the administrator can see and edit the views created by all users.
Creating Custom Views and Filters
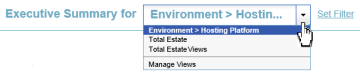
You can use the pre-defined view provided with Densify, by clicking on the global filter, located at the top of the page. The currently selected filter is displayed. The drop-down menu displays any custom views that have you have created.
The selected view controls the folder structure and the scope of clusters displayed in the Infrastructure Navigator.
- Click on the global filter to open the dropdown menu. Click on Manage Views.
- Click New, then enter a name and description for your new filter, in the View Name and View Description fields.
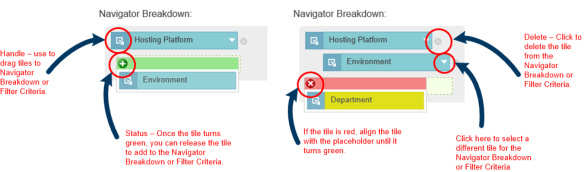
- Use the handle to drag the options from Infrastructure options, on the left side of the page, to the Navigator Breakdown area to create your view. The tile header turns green if you can add the selected option.
- Currently, only environment and hosting platform options are supported. You can adjust the order of these options to view the data in the way that best suits your application.
- Filtering can be applied by defining specific attributes. Drag the item on which you want to filter to the Filter Criteria area. Then select the operator from the dropdown menu (i.e. Equal to, Contains, Ends with, etc). and then select the value (e.g. Hosting Platform > Equal to > VMware).
- To continue building your filter beyond a single row, click +add filter and define the criteria.
- Click Save and then Apply.
You can further refine your view using your hosting venue capabilities. Capabilities, defined for your hosting venues are listed. Drag the desired attribute or click +add filter to define your view.
You can have up to 5 items defining your view, and cannot use the same descriptor more than once for a single view.
When filtering on cluster attributes, the text box under Filter Criteria shows all possible cluster names. If you enter a value, rather than selecting an option from the drop down options, Densify validates that the value corresponds to at least one cluster.
The new filter appears in the Global Filter field and now defines the scope of systems for your reports. You can select the view at any time and edit the criteria by deleting or adding options.
Deleting a View
To delete a view:
- Click on Manage Views.
- Select the view to delete from the dropdown menu and click Delete.
- Click Ok to confirm the operation.
Last Updated: June 2024
|
|
|
|
|
|
|