Using the Guest Filter
Using the Guest Filter
#380310
All three cloud platforms support user-defined resource tags to categorize your cloud utilization
These user-defined tags must be mapped to Densify attributes. Contact [email protected] for details..
Note: When working with the guest filter, be aware that the Approval Setting option is based on live data. See Using the Guest Filter, below.
The Group By features located at the right side of group filter allows you to group you data using the using the same user-defined resource tags/attributes that are used by the guest filter. See
Reports with the Guest Filter
The following reports allow you to filter instances using the guest filter:
- Public Cloud > Optimization Overview
- Public Cloud > Amazon Web Services > EC2 | RDS Optimization Reports
- Public Cloud > Microsoft Azure > Virtual Machines Optimization Reports
- Public Cloud > Google Cloud > Compute Engine Optimization Reports
Stale Data
Stale recommendations occur when data is not collected on its regular schedule, resulting in the last available recommendation, which could be months old, being displayed in the Densify Console. Environments and systems with data older than 30 days are not included in dashboards or reports.
The number of days, after which data is considered stale is configurable.
When using the guest filter, if you filter on an account with stale data, you will see the message, No Data Available. This also applies to individual systems with stale data. These systems are not included in the totals on the overview and instance optimization details pages.
Using the Guest Filter
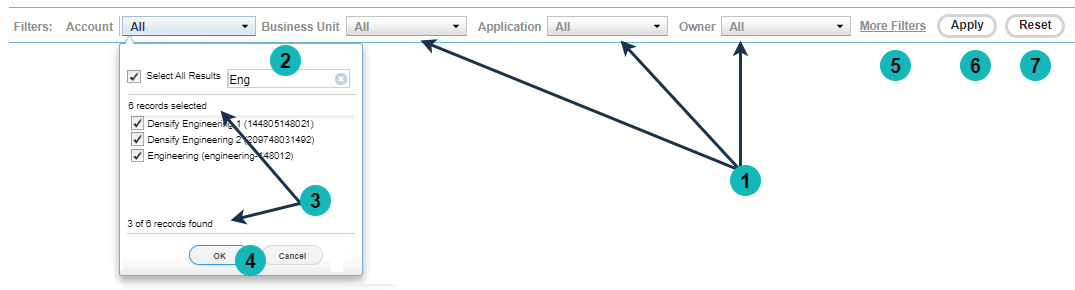
You can apply guest filters to report on a smaller, more manageable set of guests. To define a filter, from the Guest Filters strip at the top of the page:
- Select your specific filter drop-down and select the options to include.
- You can use the search feature to find specific attributes/tags/strings. See Using the Filter's Search Feature.
- Check the footnote at the bottom of the dialog box to see details about the filtered list. The total number of records are listed. If you are using the search feature, the footnote indicates how many items contain the search criteria and the total number of records.
- Click OK to set this filter.
- Click the More Filters link to define other filter criteria.
- Click the Apply button to update the page with the filter you have defined.
- Click Reset to return all of the filter settings to their defaults.
"All" is used to indicate no filtering is defined. If you select a single, item, then that item is displayed. If you select more than one item, but not all items, then "Multiple" is displayed.
The footnote does not tell you how many items have been selected. The number of selected items is shown at the top of the list.
You can click the Apply button at any time to refresh the filter settings. This includes adding/removing any new pick list values in the selection lists, that may have changed after recent data collection. It also and includes any updates the listed systems based on changes made to dynamic attributes.
The entire page, including the blue Summary banner at the top of the page, is refreshed when the guest filter is applied.
If, after applying the filter, no records meet the specified criteria, you will see the message "No Data Available".
Clicking the Reset button also adds/removes any new pick list values in the selection lists and updates the listed systems based on changes made to dynamic attributes.
Persisting Filter Settings Across Pages
The selected filter options are persistent across platform-specific optimization reports that support filtering. For example, the selected guest filters applied to the AWS EC2 report are also applied to the AWS RDS, ASG, and Spot Instances pages..
Since all cloud platforms (AWS, Azure and GCP) are aggregated on the Cloud Optimization dashboard, the guest filter is separately persistent for that tab. Settings are persistent between the Optimization Overview >Summary and Data tabs.
Note: The guest filter is not displayed on the Instance Optimization Details reports.
The guest filtering options also persist across user login sessions. When you log out and log back into Densify, your filter selections are retained for the Cloud Optimization pages and for any drill-down reports that support guest filtering.
When you are filtering on the AWS Account | Azure Subscription | GCP Project option, the filter drop-down list shows the account, subscription or project name (if available) and the account number. i.e. "Engineering Dev (1234567890)”. If the account, subscription or project name is not available, or is the same as the account number, then only the account number is used. i.e. "1234567890".
Customizing the Guest Filter
Using the Filter's Search Feature
Click the search icon in the filter selection drop downs to search for specific system attributes or tags.
- Click the drop down to open and uncheck Select All at the top of the drop down.
- Click the search icon
 to display the search bar.
 - Enter the search term and press Enter (keyboard). The list updates with all systems that contain the specified search criteria.
- Check the items you want to filter on and click OK. The selected items are added to the current settings.
- Click Apply to update the page with the filter settings you have defined.
You can enter another set of criteria to add more items to your list. This allows you to filter on multiple items.
Multi-Select Search Features
If you have items already selected in the drop down and then search and select additional items, these items are added to the items already selected. For example:
- Expand Business Unit. In the figure below, 2 items are already selected.
- Search for "trading".
- You find 2 more items and select them.
- You are now filtering on 4 values.
- You can search again and add more items to the list.
- Click OK to select these 2 items and then open the drop down again to view the complete list of items you have selected.
- Click Apply to update the page with the filter settings you have defined.
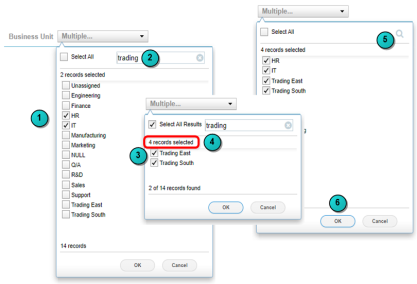
Use the notes at the top and bottom of the drop down to determine the number of items in your filter.
Additional Search Features
When using the filter's search features, note the following:
- The search is not case-sensitive.
- If no systems contain or match the search criteria, a message is displayed.
- Click
 at any time to cancel the search or clear the search box.
 - A vertical scroll bar is displayed if the list is longer than the drop down window.
- You may see a spinning icon when the search or load takes more than 1 second to display the results.
Last Updated: June 2024
|
|
|
|
|
|
|