AWS Data Collection Prerequisites for an IAM Role
AWS Data Collection Prerequisites for an IAM Role (CloudWatch only)
#410070
Overview
Densify collects resource utilization metrics (CloudWatch data) for your AWS services (e.g. EC2, RDS, ECS, etc.), analyzes the AWS data and then makes recommendations to save costs and reduce risks in your AWS environments.
Collecting data via a cross-account IAM Role simplifies the process of connecting to multiple AWS accounts from Densify since the same role and external ID can be used across your multiple AWS accounts. As accounts are added or removed, you do not need to update the Densify cloud connection.
Note: Though the cloud connection wizard provides the option to use an IAM user and an access key, Densify recommends using the IAM Role.
The following list summarizes the prerequisites steps to be completed in your AWS account(s) before you can create a Densify connection to collect CloudWatch utilization data.
- In each linked and payer account, create an AWS role. Optionally, use the same name and external ID. You must enter the following Densify account that will assume the role:
- Select and assign AWS's predefined, ReadOnlyAccess policy. This policy is an easy option for non-sensitive accounts. In most cases, you will need to create a permission policy to grant minimum access.
- Once the AWS role has been created, copy the ARN and the External ID to create the Densify connection.
- Define your resource tags. The value of the resource tag can be used for filtering within Densify. You must tag your resources appropriately and then map your AWS Resource tags to Densify attributes so the tags will be included in the analyses. Contact [email protected] for details. See the video: Tagging for Cloud Optimization.
036437403198
This is the AWS account that becomes the trusted entity.
Creating Connections from the Payer Account
In addition to creating connections from your linked accounts, you also need to create a Resource Utilization Metrics (CloudWatch) connection for your payer account. The payer account connection provides additional data when working with reserved instances and savings plans.
Working with Reserved Instances
When working with Reserved Instances you must collect both CloudWatch and billing data from all accounts in which you are using Reserved Instances. Since RIs can be shared between linked accounts they are often purchased through the payer account, so in order to see how the RI's are utilized, you need to collect both CloudWatch and billing data from the payer account.
Using an IAM Role
When you create a role for cross-account access, you establish trust from the customer's account that owns the role (and the resources (trusting account) to the Densify account containing the user that will collect data (trusted account). You specify the trusted account number as the Principal in the role's trust policy when you create the role. This allows the Densify user in the trusted account to assume the role and collect utilization data.
In order to create an AWS connection in Densify to collect your AWS resource utilization (CloudWatch) data you need to create an IAM role for every linked or payer account.
Follow the process below to create and configure the IAM role for CloudWatch data collection. See
Creating the IAM Role and Attaching a Permission Policy to Collect CloudWatch Data
This role allows you to collect resource utilization data for the selected account. You need to attach a policy that allows the role to collect the required CloudWatch resource utilization metrics.
- Log into the AWS Management Console and navigate to Services > Security, Identity & Compliance > IAM. In the navigation tree on the left, click Roles.
- Click Create Role in the Roles dashboard.
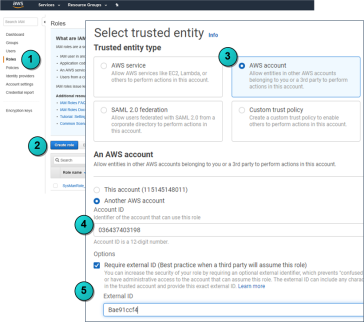
- Select AWS account as the type of trusted entity.
- Enter an Account ID. This is the Densify account that will assume the role. Enter the following Densify account ID: 036437403198.
- Select Require external ID and enter your external ID. This value is similar to a password and should be unique and difficult to guess. Densify recommends using a password generator to create a random, alphanumeric string (e.g. ae73mcf4ldjpet96) for the external ID.
- Click Next.
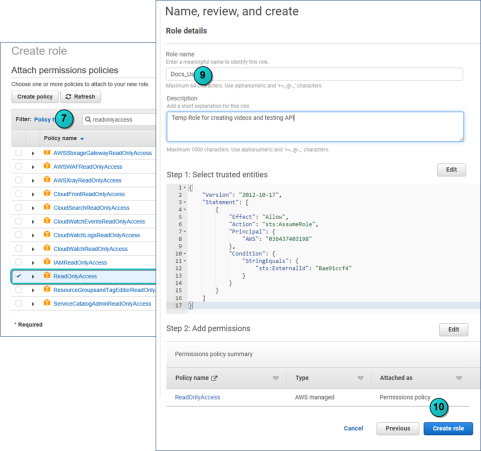
- Attach the appropriate permission policy to the role. Select AWS's predefined ReadOnlyAccess policy. Use the filter to find the ReadOnlyAccess policy. Even with the filter set you will need to page through qutie a few options to find the "ReadOnlyAccess" policy.
- After selecting the permission policy for the role, click Next.
- In the Review page, specify the Role name and Role description. The role name can be any string used to identify and describe the role within the AWS account (e.g. DensifyCrossAccountRole).
- Click Create role. The new role is created.
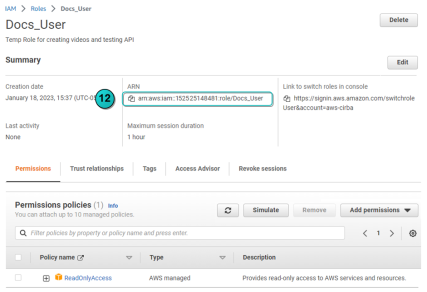
- From the Roles page, click on the role name that you have just created, to view the role summary.
- Copy and save the Role ARN as you will need to paste this string into the Densify Cloud Connection wizard to create the connection.
- You can now create an AWS connection through the Densify Public Cloud Connection wizard. See
You will need this external ID later, when creating the cloud connection in Densify.
Note: The ReadOnlyAccess policy is provided here as an easy option for non-sensitive accounts. In most cases, you need to create a custom permission policy to grant Densify, the permissions to collect only the required CloudWatch data. Refer to Creating an IAM Policy with Minimum Permissions for the CloudWatch Data Collection for details.
You can also use the Densify API.
Optional Configuration
The following sections contain detailed instructions for optional configuration. Some of this configuration is referenced in the procedures above.
- Resource Tagging
- Creating an IAM Policy with Minimum Permissions for the CloudWatch Data Collection
- Enabling Collection of AWS Memory Usage Metrics
You must define your resource tags for the grouping and filtering options to be used effectively. The value of the resource tag can be used for grouping and filtering your AWS instances within Densify. See the following video: Tagging for Cloud Optimization
You must tag your resources appropriately and then map your AWS Resource tags to Densify attributes so the tags will be included in the analyses. Contact [email protected] for details.
Creating an IAM Policy with Minimum Permissions for the CloudWatch Data Collection
To simplify setup and maintenance of either an IAM user account or an IAM role for performing the CloudWatch audit, Densify recommends attaching the AWS-managed “ReadOnlyAccess” policy to the user or role. This policy provides read-only access to your AWS services and resources and supports the requirements of the Densify CloudWatch audit. As the Densify CloudWatch audit continues to evolve and expand, you do not need to update permission policy to include newly added services and features.
Alternatively, if you must restrict the IAM user or role with the minimum permissions to perform the CloudWatch audit, you can create a custom policy with only the required permissions, as shown below.
Note: This custom policy must be updated periodically as Densify’s standard audit requirements are updated to support additional AWS services and features.
Example: AWS Minimum User Permission Policy
{
"Version": "2012-10-17",
"Statement": [
{
"Sid": "Stmt1499171905000",
"Effect": "Allow",
"Action": [
"autoscaling:DescribeAutoScalingGroups",
"autoscaling:DescribeLaunchConfigurations",
"cloudformation:DescribeStackResource",
"cloudformation:DescribeStackResources",
"cloudformation:ListStackInstances",
"cloudformation:ListStackResources",
"cloudwatch:GetMetricData",
"cloudwatch:GetMetricStatistics",
"cloudwatch:ListMetrics",
"ec2:DescribeHosts",
"ec2:DescribeImages",
"ec2:DescribeInstances",
"ec2:DescribeLaunchTemplateVersions",
"ec2:DescribeRegions",
"ec2:DescribeSnapshots",
"ec2:DescribeVolumes",
"ec2:DescribeSubnets",
"ec2:DescribeSecurityGroupRules",
"ec2:DescribeSecurityGroups",
"ec2:DescribeVpcs",
"ecs:DescribeCapacityProviders",
"ecs:DescribeClusters",
"ecs:DescribeContainerInstances",
"ecs:DescribeServices",
"ecs:DescribeTaskDefinition",
"ecs:ListClusters",
"ecs:ListContainerInstances",
"ecs:ListServices",
"ecs:ListTagsForResource",
"ecs:ListTaskDefinitions",
"eks:DescribeCluster",
"eks:ListClusters",
"elasticache:DescribeCacheClusters",
"elasticache:DescribeReplicationGroups",
"elasticache:ListTagsForResource",
"iam:ListAccountAliases",
"organizations:DescribeOrganization",
"organizations:ListAccounts",
"rds:DescribeDBInstances",
"rds:DescribeReservedDBInstances",
"rds:DescribeDBClusters",
"rds:ListTagsForResource"
],
"Resource": "*"
}
]
}Note: The permissions related to CloudFormation are used for linking ASGs with ECS clusters. If these permissions are not included and the data is not available, linking the ASGs to ECS clusters may be done based on existing container instances. If the permissions are missing, Densify may not link some ASGs to their ECS clusters,
- Log into the AWS management console and navigate to Services > IAM.
- Select Policies and click Create policy.
- Click the JSON tab and enter the policy from the example above.
- Review the policy and enter a policy name (e.g. DensifyMinimumReadAccess) and a description (e.g. Minimum permissions required for Densify standard audit).
Enabling Collection of AWS Memory Usage Metrics
Memory metrics are not collected by default, and they are not required to complete the Densify analyses. You can manually enable collection of memory and disk metrics.
Note: The CloudWatch Agent must be installed and configured on each instance for which you want to obtain memory and/or disk metrics. Refer to the AWS user documentation for details. See https://docs.aws.amazon.com/AmazonCloudWatch/latest/monitoring/Install-CloudWatch-Agent.html
Once the CloudWatch Agent is installed and configured, Densify uses the default, CWAgent as the namespace for metrics collected by the CloudWatch agent.
Additionally, when working with ASGs, ASG EC2 members will have memory utilization data using the basic memory settings, but you need to specify "aggregation_dimensions" to collect memory, aggregated at the ASG level.
Use the following information to configure the CloudWatch Agent (CWagent) via config.json to collect the metrics that Densify can use for analyses. Instructions are provided for both Linux and Windows instances.
For Linux instances, the default CWagent config.json file can be generated based on the following options:
- Basic
- Standard
- Advanced
For all of the above options, the memory metric, “mem_used_percent” is collected by default, as specified in the config.json file. However, the metrics “mem_active” and “mem_used” should be added to the CWagent's settings, for Densify's analysis.
Additionally, the disk “total” metric should be included if you want to analyze disk usage.
The following example shows the updated version of the Basic config.json file with the additional metrics highlighted:
Example: Basic CWAgent Configuration File For Linux Instances
{
"agent": {
"metrics_collection_interval": 60,
"run_as_user": "root"
},
"metrics": {
"append_dimensions": {
"AutoScalingGroupName": "${aws:AutoScalingGroupName}",
"ImageId": "${aws:ImageId}",
"InstanceId": "${aws:InstanceId}",
"InstanceType": "${aws:InstanceType}"
},
"aggregation_dimensions": {
[
["AutoScalingGroupName"],
],
},
"metrics_collected": {
"disk": {
"measurement": [
"total",
"used_percent"
],
"metrics_collection_interval": 60,
"resources": [
"*"
]
},
"mem": {
"measurement": [
"mem_used",
"mem_active",
"mem_used_percent"
],
"metrics_collection_interval": 60
}
}
}
}
For Windows instances, the default CWagent config.json file are the same as listed above, Basic, Standard and Advanced.
For all of the above options, the memory metric, "% Committed Bytes in Use" is collected by default, as specified in the config.json file. However, the metric “Available MBytes” should be added to the CWagent's settings, for Densify's analysis.
The following example shows the updated version of the Basic config.json file with the additional metric highlighted:
Example: Basic CWAgent Configuration File for Windows Instances
{
"agent": {
"metrics_collection_interval": 60,
"run_as_user": "root"
},
"metrics": {
"append_dimensions": {
"AutoScalingGroupName": "${aws:AutoScalingGroupName}",
"ImageId": "${aws:ImageId}",
"InstanceId": "${aws:InstanceId}",
"InstanceType": "${aws:InstanceType}"
},
"aggregation_dimensions": {
[
["AutoScalingGroupName"],
],
},
"metrics_collected": {
"LogicalDisk": {
"measurement": [
"% Free Space"
],
"metrics_collection_interval": 60,
"resources": [
"*"
]
},
"Memory": {
"measurement": [
"Available MBytes",
"% Committed Bytes In Use"
],
"metrics_collection_interval": 60
}
}
}
}
If you are using a third-party application to collect memory metrics, the collected data can be loaded using the Receive Metrics API endpoint.
Refer to the AWS user documentation for details on using the CloudWatch Agent to collect memory metrics.
Last Updated: June 2024
|
|
|
|
|
|
|