Installing the Densify Connector
Installing the Densify Connector
#380020
The user account that you use to install the connector requires permission to install and start services on the machine or VM, where the Densify Connector is installed.
If you encounter issues installing the Densify Connector, it is likely that you do not have the correct privileges. Right-clicking the Densify Connector executable and selecting "Run as administrator" to install with elevated privileges.
- Double click the file to run the Densify Connector executable.
- The welcome page is displayed with details of the data collection process.
- Click Next to continue and follow the on-screen instructions.
- The Installation Directory screen is displayed for you to select the installation location (by default C:\Program Files\Densify Connector\). Click Next to confirm and start the installation.
- Click Finish to complete the install, start the Densify Connector service and to open the configuration screen.
Note: The scheduling component of the Densify Connector runs as a service.
Upgrading the Densify Connector
When you are upgrading, the process is the same as the installation with one exception. During an upgrade, the installer automatically uninstalls the previous version of the Densify Connector before installing the new version.
The upgrade process retains your connection settings and all audit files.
Configuring the Densify Connector
Before you can run the Densify data collection, you need to complete the following steps:
- Create a connection for each vCenter—define the connection information along with, optionally its vROps manager connection information
- Enable data transfer—define your settings and enable data transfer of the collected data to your Densify instance.
Once the collected data is transferred, Densify analytics are run and you can review the Densify reports.
Once the Densify Connector is installed, you need to configure each vCenter Server connection and optionally its vROps manager connection.
With vROps, you can obtain a one-time collection of historical workload data plus a daily collection of workload data. In this way, you do not need to wait for days to acquire enough workload data to perform your analysis. The recommendations generated from vROps are also collected enabling you to compare them with the recommendations generated by Densify's analytics. To view this comparison, contact [email protected].
The general procedure is summarized by the figure below, from clicking on the New Connection, defining the connections, verifying the connections, performing a data collection and saving.
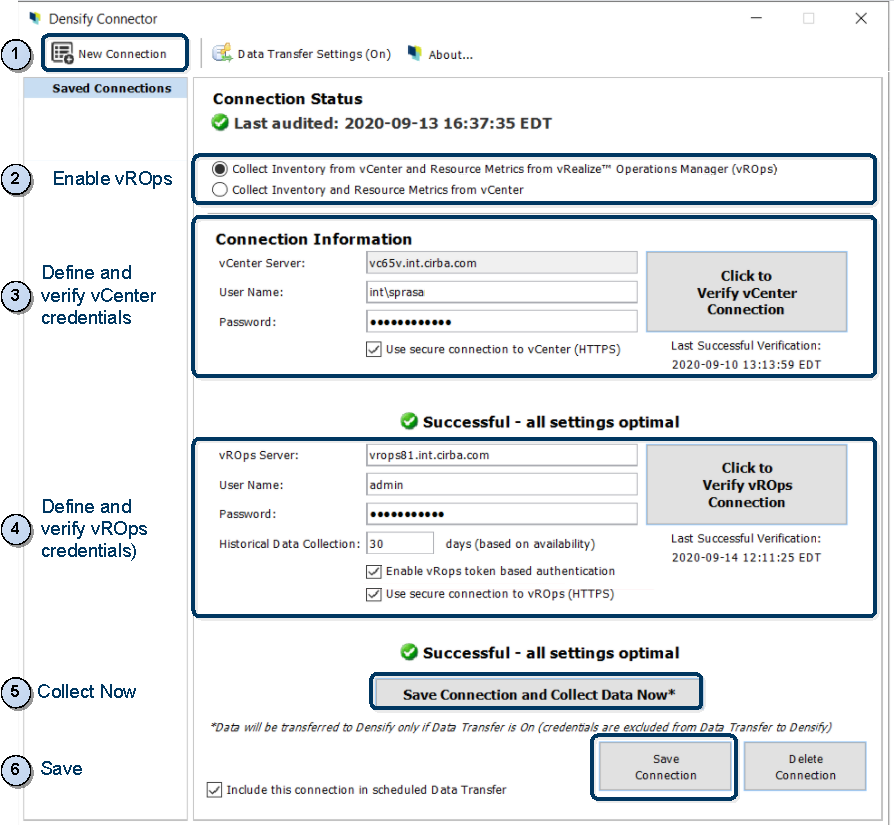
For each vCenter:
- Click on New Connection.
- Select whether or not you wish to collect workload data through vROps, using the toggle at the top.
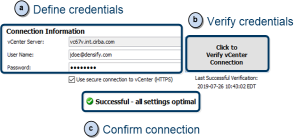
- Define, verify and confirm your vCenter Server connection information:
- Enter the connection information:
- Click the Click to Verify vCenter Connection button to test your connection definition.
- Confirm that the verification completed successfully. The Last Successful Verification timestamp is updated when the verification successfully completes.
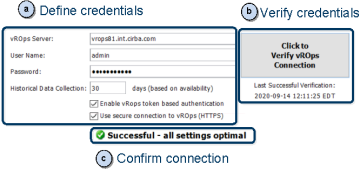
- If you selected vROps (i.e. first bullet selected in Step 2), define and verify your vROps server connection information.
- Enter the connection information:
- Click the Click to Verify vROps Connection button to test the connection definition.
- Confirm that the verification completed successfully. The Last Successful Verification timestamp is updated when the verification successfully completes.
- You can optionally use the Save Connection and Collect Data Now button to ensure that there is no error in the data collection. The Last Data Collection timestamp is updated when the collection successfully completes (using the time zone of the Densify Connector itself).
- Click Save Connection to save the connection information. The connection is added to the Saved Connections list.
- To remove any connection that you no longer wish to audit:
- Select it within the Saved Connections list and click Delete Connection.
- To exclude a selected connection from its scheduled data collection, select it within the Saved Connections list, and de-select the option Include this connection in scheduled Data Transfer, and click Save Connection.
|
Setting |
Description |
|
vCenter Server |
Enter a vCenter name. |
|
User Name |
Enter the user name that has the required permissions to the specified vCenter. The format of the user name can be entered as user@domain or the NTLM formatted domain\user. Contact your vCenter administrator for details of how to enter your user name. |
|
Password |
Enter the password for the user account, specified above. Store encrypted passwords using AES128 encryption. |
|
Use secure connection to vCenter (HTTPS) |
This option to use a secured connection (HTTPS) is enabled by default. This is the recommended setting. |
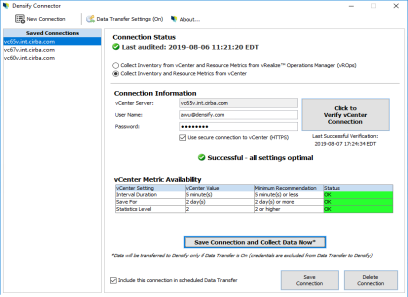
If using the vCenter for resource metrics (i.e. second bullet selected in Step 2), review the vCenter Metric Availability settings to ensure they meet the Densify minimum requirements. If any Status is returns an ERROR, then the minimum requirements are not met and you must update the vCenter Server settings accordingly. Ideally, all settings should return the OK status, in order to obtain the best analytics with all of the workloads and no gaps in your data.
|
Setting |
Description |
|
vROps Server |
Specify the vROps server name, using a short name, IP address or fully qualified domain name. Note: If using a fully qualified domain name, you must disable the vROps Tomcat web server launcher TLS extension, otherwise, a connection error will occur. See http://docs.oracle.com/javase/7/docs/technotes/guides/security/jsse/JSSERefGuide.html for details. |
|
User Name, Password |
This is the local user or domain user account with permission to log into vROps. This user account must have access to view all datacenters, required for your analysis. When entering the domain user account, specify <username>@<domain>@<authenticated source>. e.g. [email protected]@densify. Refer to |
|
Historical Data Collection |
Specify the workload data to request a one-time collection of historical data. The drop down calendar indicates the valid days from which you can choose. The default is 30 days, if available. Note: vROps historical data collection occurs only once after a new connection is saved. To collect additional historical vROps data for an existing Connector connection, you will need to delete and recreate the Connector connection to trigger the historical data collection process. |
|
Enable vROPs token-based authentication |
Enable this option to use token-based authentication.
|
|
Use secure connection to vCenter (HTTPS) |
This option to use a secured connection (HTTPS) is enabled by default. This is the recommended setting. |
In order to transfer the collected data to Densify, you must define the data transfer settings and enable data transfer.
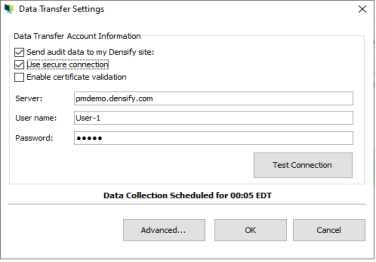
- Click Data Transfer Settings button to display the following dialog box.
- Define your Densify site information.
- Click Advanced... to define the port numbers, data collection start time, etc., as necessary. Click OK to save.
- Click the My connection requires a proxy server to access the internet button if a proxy server is necessary to access the internet.
- In the Data Transfer Settings dialog box, click the Test Connection button to test your connection definition.
- Click OK to save your Data Transfer Settings.
|
Setting |
Description |
Default |
|
Send audit data to my Densify site |
When enabled, audits (from both Collect Data Now and scheduled data collections) are transferred to your Densify instance, via HTTP. Port 8086 is set for HTTP connections. When disabled, audits (from both Collect Data Now and scheduled data collections) are not transferred. These files will be transferred to Densify after this option is enabled, on the next scheduled collection. |
Enabled |
|
Use Secure Connection |
Specifies that the data transfer will be via HTTPS or SSL connection. When disabled, the data is transferred via HTTP. |
Enabled |
|
Enable certificate validation |
Specifies whether or not to bypass certificate validation. This option only applies when the above option Use Secure Connection is checked. By default, certificate validation is not performed If you opt for the Connector to bypass certificate validation, you then delegate this job to the proxy server, when a secure connection for data transfer is used. When delegated, the proxy server is responsible for establishing secure communication to the Densify service, validating both the certificate as well as the connection to the Connector. |
Disabled |
|
Server |
This is the server running Densify. Specify the server to which you will upload your collected data. You do not need to specify HTTPS or the port number. Contact [email protected] for the name of your Densifyserver instance. |
Server Name |
|
User Name, Password |
Specify the Densify user account having RESTful Web API privileges. Contact [email protected] for the user name and password. |
Password |
|
Setting |
Description |
Default |
|
SSL instance port |
Specify the port used for the HTTPS transfer. If different from the 443 default, you must first notify [email protected] of the change. |
443 |
|
Service port |
This is the port on which the scheduler service runs. Note: Do not modify the service port unless instructed by [email protected]. |
6789 |
|
Number of days to keep audits |
The audit files in the repository folder and repository\sent subfolder older than the specified value are automatically purged. A value of 0 means that the files are deleted immediately. In general you do not need to change this value. For best practices, you may wish to keep a few days of data, to ensure that files have been sent. |
10 |
|
Number of audits pending submission |
The maximum number of audit files that are pending to be transferred to Densify (i.e. in the repository\pending folder). This includes both scheduled and Collect Data Now audits, only when Data Transfer is off. Once the limit is reached, the files from new audits are saved to the repository folder instead. When the Data Transfer is enabled, the files in the repository\pending folder are transferred to Densify and moved to the repository\sent folder, on the next scheduled collection. Note that in general you do not need to change this value. |
10 |
|
Collection start (HH:mm) |
By default, all VMware audits are scheduled to begin at 12:05 am, daily. Starting just after midnight ensures that the workload history for the previous 24-hour period has been processed by the vCenter/vROps and will be collected by Densify. Specify the start time, in 24-hour format (HH:mm), using the time of Densify. This is the time when the data collection will start every day. The vCenter stores workload data in a 24-hour moving window. If Data Retention is set to 1 day only, you need to start your data collection as close to midnight as possible in order to get the full day (24 hrs) of data. In general you do not need to change this value. If you need to adjust the start time due to time zone considerations, contact [email protected] for details. |
00:05 |
|
Use this option to disable automation. If disabled, action automation will not be performed through the Densify Connector. This includes Real-Time and Proactive Automation. If enabled then see You must stop and restart your connector service, when you enable this setting. See Restarting the Connector Service. A restart is not required when you disable this setting. |
Enabled |
|
|
Internet Connection Settings |
If a proxy server is required to access the internet, update this section accordingly. |
Disabled. |
|
Setting |
Description |
|
My connection requires a proxy server to access the internet |
Enable this option if you need to use a proxy server to connect to the internet. |
|
Proxy server |
Specify the name of the proxy server to be used. |
|
Proxy port |
Specify the port to be used. The default is 8080. |
|
My proxy server requires authentication |
Enable this option if the proxy server needs to be authenticated. |
|
User name and password |
Specify the user name and password to be used to authenticate Densify. |
Note: If your trial or subscription has expired, a message will be added to the log files.
Once this feature is enabled, automatic HTTPS uploads will occur immediately following each data collection, whether scheduled or performed through the Collect Data Now button.
You can launch Densify to view the results of the control analytics of your data collection. The results are available usually the next day, depending on the configuration of your Densify Connector. For example, if you configured the Densify Connector to collect data at 00:05 (i.e. 12:05 AM), the Control Console and resulting reports will be available the next morning when you arrive to work. The exact time depends on the size of your environment.
If the Densify Connector cannot establish a connection to the Densify Server (i.e. during a maintenance window), it will retry up to 10 times waiting 10-minutes between each retry.
If after this time, the connection still cannot be established, then the collected data is put into the pending folder. When the Densify Connector is able to establish a connection, on the next scheduled audit, it will then upload the current audit data as well as any audits in the pending folder. No collected data will be lost.
Changing the vCenter Collection Configuration
If you make changes in your vCenter Server, such as changing the sampling interval or statistics level, then you should verify these settings through the Densify Connector:
- Select your vCenter Connection from the list of Saved Connections and click Verify vCenter Connection.
- Verify that the Status is still OK for all vCenter settings.
- Click Save to save the changes.
When you are using action automation there are additional utilities that must be installed and configured on the same machine as the connector. In addition to Microsoft® PowerShell and .NET Framework, you need to install and configure the VMware vSphere PowerCLI.
- Register an account with VMware and then download vSphere PowerCLI. Prior to installing or upgrading the PowerCLI version on your Densify Connector, please check Densify Connector Compatibility.
- Install and run the vSphere PowerCLI.
Note: Running a PowerCLI version that is incompatible with the Densify Connector may result in Action Automation failing to execute.
In some environments, depending on your security settings, you may encounter an error when trying to run the action automation scripts.
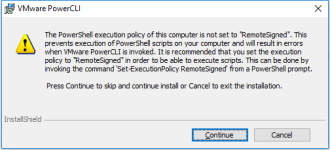
In this case it may be necessary to set the parameter, PowerCLI Execution Policy to "RemoteSigned":
- On the machine that is hosting the connector, run PowerCLI as administrator.
- In the PowerCLI command window execute the following command:
- Confirm the change by selecting [Y] for the specified change only, and not [A] to change all parameters.
- Close the PowerCLI window and relaunch it, to verify the changes have been made.
Set-ExecutionPolicy RemoteSigned
Verify the connectivity between vSphere PowerCLI and the vCenters from which data is being collected.
- On the machine, that is hosting the connector, run PowerCLI as administrator.
- In the PowerCLI window execute the following command:
- If you are connected, the command returns the name of the vCenter, connection port and your user name.
- If you are still encountering issues, you may have proxy settings that are preventing connectivity. See VMware KB https://kb.vmware.com/kb/2011395.
Connect-VIServer <name_of_vCenter>
For example: Connect-VIServer VC65V.int.Densify.com
If you are logged in as a domain user with access to the selected vCenter your connection should go through automatically. If you are not using an authenticated credential, you will be prompted to enter credentials that have access to the vCenter.
If you want to connect using a specific user account, then use the option "–user". For example:
Connect-VIServer VC65V.int.Densify.com –user jsmith
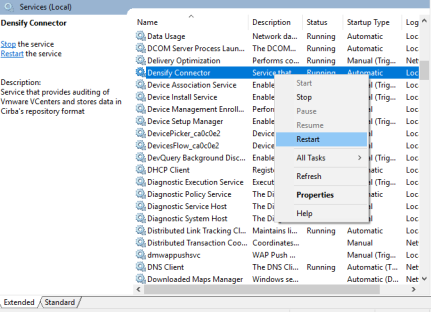
When you change some of the connector's configuration settings you may need to restart the connector service.
- On the machine, that is hosting the connector, open the Windows Service manager and restart the Densify Connector service. This is the same as stopping and then starting the service.
Reviewing Data Collection Files
If you need to review your data collection files, they are located in the repository subfolder of your Densify Connector installation.
During data collection (either scheduled or through the Collect Data Now button), the collected data is written to the repository folder. One file is created per vCenter Server, whether or not vROps is used.
With Data Transfer Settings defined and enabled, these files are transferred immediately to your Densify platform and moved to the repository\sent folder.
With Data Transfer Settings disabled, these files are moved to the repository\pending subfolder, pending to be transferred to your Densify platform. These files are transferred after you define and enable the Data Transfer Settings, on the next scheduled data collection. Once transferred, the files are moved to the repository\sent folder.
Removing the Densify Connector
If necessary, you can remove the Densify Connector from your local system. The uninstall utility will remove all files but not the collected data nor the configuration.
- From Windows Explorer, navigate to your install directory. For example, by default:
- Double-click the uninstaller.
- The uninstall utility will indicate when it is complete.
- To remove the collected data and configuration, delete the entire install directory. For example, by default, remove the following directory:
C:\Program Files\Densify Connector\
C:\Program Files\Densify Connector\Uninstall Densify Connector
C:\Program Files\Densify Connector\
SSL Certificate Management
When using SSL-enabled connections for data transfer, the Densify Connector validates the certificate each time a connection is initiated to your Densify instance. The Connector loads the required certificate from your Densify instance.
If the Densify Connector's certificate expires, it will re-load the certificate from Densify.
This certificate validation only applies to your Densify instance, and not to vCenter data collection. Currently, the Connector automatically accepts certificates from the vCenter Servers that it is auditing.